
Introduction
Want to earn extra income from home? Then, becoming a WeRize DSA (Direct Selling Agent) is perfect for you! Moreover, the registration process is simple and quick, taking only 10-15 minutes.
WeRize makes it easy to become a DSA via their mobile app. Therefore, you don’t need to visit any office or fill out long forms. Furthermore, the entire process is completely digital and free.
In this guide, we’ll show you exactly how to become a WeRize DSA step by step. By the end, you’ll be ready to register as a WeRize DSA and start your earning journey.
So, let’s get started and explore how simple it is to join WeRize’s network of 50,000+ partners!
Why Become a DSA with WeRize?
Before we discuss registration, let’s understand why WeRize is the best choice for aspiring DSAs.
Top Benefits of WeRize Partnership
1. Attractive 4% Commission WeRize offers one of the highest commission rates in the industry. You earn 4% on every loan you help disburse. Moreover, you receive 2% upfront and 2% in recurring installments.
2. Zero Investment Required. Unlike other programs, WeRize requires no joining fees or deposits. Therefore, anyone can start without a financial burden. Furthermore, all training and support are provided at no cost.
3. Easy Mobile App Registration The entire registration process happens through the WeRize Partner App. Consequently, you can register from anywhere in India. Moreover, approval is quick and hassle-free.
4. Multiple Loan Products As a WeRize DSA, you can offer personal loans, business loans, LAP, and UBL. Therefore, you serve diverse customer needs and maximize your earnings.
5. Flexible Working Work according to your own schedule. Additionally, there are no mandatory daily targets. Hence, you can easily balance WeRize work with your other commitments.
6. Focus on Tier 2 & 3 Cities. WeRize specifically serves smaller towns and cities. Therefore, competition is lower and opportunities are higher in your area.
What You Need Before Starting
Before you register as a WeRize DSA, gather these essentials. Having everything ready makes the process smooth and fast.
Essential Requirements Checklist
| Requirement | Why You Need It | Important Notes |
| Smartphone | To download and use the WeRize Partner App | Android phone required |
| Internet Connection | For app download and registration | Mobile data or WiFi |
| PAN Card | Mandatory for commission payments | Must be valid and active |
| Aadhaar Card | For identity verification | Should be linked to mobile |
| Mobile Number | For OTP verification | Must be active |
| Email Address | For communication and updates | Valid email required |
| Bank Account | To receive commission payments | Active account needed |
| Current Address | For PIN code entry | Your residential address |
Basic Eligibility Criteria
Additionally, ensure you meet these basic criteria:
- Age 18 years or above
- Indian citizen
- Basic smartphone knowledge
- Clean background
Therefore, if you have these documents and meet the criteria, you’re ready to proceed!
How to Become a WeRize DSA
Here is the exact process to become a WeRize DSA (Direct Selling Agent). Follow these simple steps carefully.
Step 1: Download and Install the WeRize Partner App
Download and install the official WeRize Partner App from the Google Play Store on your Android smartphone. Once installation completes, tap “Open” to launch the app.
Important Tips:
- Ensure you have a stable internet connection
- Download only from the Google Play Store
- Check that it’s the official WeRize app
- Allow necessary permissions when asked
Step 2: Sign In and Complete OTP Verification
When you open the App, you’ll see the welcome screen. Now, enter your mobile number in the provided field. Make sure you enter the correct number.
After entering your number, tap “Send OTP” or “Continue.” Within seconds, you’ll receive a 6-digit OTP on your mobile. Then, enter this OTP in the verification screen.
Once you enter the correct OTP, the App will verify your number. Consequently, you’ll move to the next step automatically.
Pro Tips:
- Use a number that’s active and accessible
- Check your messages if the OTP doesn’t appear
- Wait for 30 seconds before requesting OTP again
- Ensure you have network coverage
Step 3: Select Your Reason for Joining
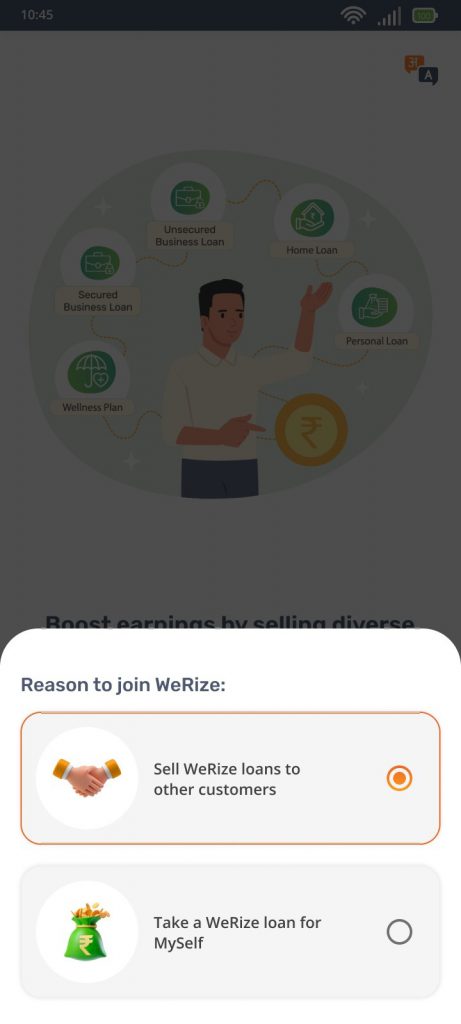
Next, the app will ask why you’re joining WeRize. You’ll see the options on the screen. However, you need to select “Sell WeRize loans to other customers.”
This option registers you as a partner, not as a loan applicant. Therefore, choose carefully. After selection, tap “Continue” or “Next” to proceed.
Important Note: If you accidentally select the wrong option, you might register as a customer instead of a DSA. Therefore, read the options carefully before selecting.
Step 4: Fill in Your Basic Personal Details
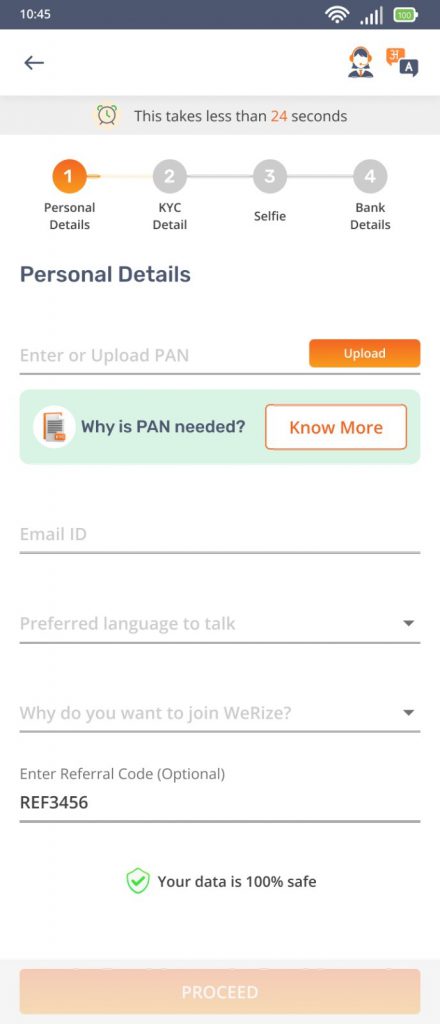
Now comes the essential information section. Fill in these details accurately:
PAN Number:
- Enter your PAN card number
- Check for spelling mistakes
- This is mandatory for commission payments
Email ID:
- Provide a valid, active email address
- Avoid temporary or fake emails
- You’ll receive important updates here
- Use a a professional email if possible
Current Address PIN Code:
- Enter the PIN code of your residential address
- Make sure it’s correct
- This determines your service area
Preferred Language:
- Select the language you’re comfortable with
- This affects App interface and communication
- You can change this later if needed
After filling in all details, review them once. Then, click “Proceed” to continue.
Common Mistakes to Avoid:
- Wrong PAN number entry
- Typing errors in email
- Incorrect PIN code
- Not reviewing before submitting
Step 5: Aadhaar Verification and CKYC
This step is crucial for identity verification. The process has two possibilities:
If CKYC is Auto-Fetched: Sometimes, the system automatically fetches your KYC details using your PAN. If this happens, you’ll see a success message. Then, simply proceed to the next step.
If CKYC is Not Auto-Fetched: If CKYC is not auto-fetched, don’t worry. You’ll need to verify manually. Here’s how you do it:
- Enter your 12-digit Aadhaar number
- Tap “Send OTP” or “Verify”
- You’ll receive an OTP on your Aadhaar-linked mobile number
- Enter this OTP in the App
- The system will verify your details
- Wait for verification to complete
Important Points:
- Your Aadhaar must be linked to your mobile number
- If OTP doesn’t come, check if your number is linked
- Link your Aadhaar to your mobile before registration
- This step ensures your identity authenticity
Step 6: Capture Your Selfie
After Aadhaar verification, you’ll be asked to take a selfie. This is for face verification and security purposes.
How to Take a Good Selfie:
First, find a well-lit area. Then, hold your phone at arm’s length. Make sure your entire face is visible in the frame. Besides, remove glasses if possible. Also, ensure there’s a plain background.
When ready, tap the “Capture Photo” button. The App will take your picture. After that, the system verifies your photo automatically. If verification succeeds, you’ll see the “Verification Successful” message.
Selfie Tips:
- Use good lighting (natural light is best)
- Face the camera directly
- Remove caps or sunglasses
- Ensure your face is clearly visible
- Avoid shadows on your face
If the first attempt fails, don’t worry. Simply retake the photo following the guidelines.
Step 7: Add Your Bank Account Details
Finally, you need to add your bank account information. This is where WeRize will send your commission payments.
Required Bank Details:
- Bank account number
- Account holder name (as per bank records)
- IFSC code
- Bank name
- Branch name (optional)
Enter all details carefully. Moreover, double-check the account number and IFSC code. Even one wrong digit will cause payment failures.
Important Note: This step is skippable initially. If you want to add bank details later, you can. However, we recommend adding them now. Otherwise, you cannot receive commissions until you add them.
After entering bank details, tap “Submit,” and your registration is completed.
Registration Complete!
Now, you’re a registered WeRize DSA (Direct Selling Agent). The App will show a success message. Additionally, you’ll receive a confirmation email.
Hence, you’re now ready to start your journey and earn commissions!
Understanding CKYC Verification
Many people get confused about CKYC verification. Let’s understand it clearly.
What is CKYC?
CKYC stands for Central Know Your Customer. It’s a centralized database of customer KYC records. When you complete KYC with any bank, your details are stored centrally.
Why CKYC Matters
If your CKYC is available, WeRize can fetch your details automatically. This saves time because you don’t need to verify Aadhaar manually. Moreover, it speeds up the registration process.
What If CKYC Doesn’t Work?
If CKYC isn’t auto-fetched, do not worry; this is common. Simply proceed with manual Aadhaar verification. It takes just 2-3 extra minutes. Further, the result is the same.
How to Check CKYC Status
You can check if your CKYC exists by visiting the CKYC official website. However, this isn’t necessary for WeRize registration. The app will tell you automatically.
What Happens After Registration?
After you successfully register as a WeRize DSA, here’s what happens next.
Confirmation: You’ll receive a confirmation email from WeRize. Additionally, you’ll see your partner dashboard in the app, and your unique partner ID will be generated.
App Access: Your WeRize Partner App is now fully functional. Hence, you can explore all features, and you can start adding customers immediately.
Training Materials: WeRize provides training videos and documents. Watch these to understand products and processes. Moreover, this knowledge helps you serve customers better.
Explore the App: Take time to go through all the App sections. Understand where everything is located. Additionally, check your profile and settings.
Learn Products: Study the loan products WeRize offers. Know their eligibility criteria, interest rates, and features. Hence, you can answer customer questions confidently.
Plan Your Strategy: Decide how you’ll find customers. Think about your network and local area. And, plan your daily activities and goals.
Start Small: Begin with people you know. Help friends or family if they need loans. This builds your confidence gradually.
Conclusion
Learning how to become a WeRize DSA is simple. The registration process takes only 10-15 minutes. Moreover, it’s completely free and happens entirely online.
To summarize, here’s how to become a DSA with WeRize:
- Download the WeRize Partner App
- Sign in with mobile OTP
- Select “Sell WeRize loans”
- Fill personal details (PAN, email, PIN code)
- Complete Aadhaar verification
- Capture a selfie for verification
- Add bank account details
Furthermore, WeRize offers excellent benefits like the industry’s best commission, zero investment, work flexibility, and comprehensive support. Therefore, it’s an ideal opportunity for anyone wanting additional income.
Also, remember that registration is just the beginning. After that, your success depends on your effort and customer service. However, WeRize provides all the tools and support you need.
So, what are you waiting for? Download the WeRize Partner App today and register as a WeRize DSA. Start your journey toward financial independence now!
Frequently Asked Questions
Q1: How long does it take to become a WeRize DSA?
The entire registration process takes only 10-15 minutes. However, if you face any verification delays, it might take up to 30 minutes. Moreover, approval is usually instant after completing all steps.
Q2: Is there any fee to register as a WeRize DSA?
No, registration is completely free. WeRize doesn’t charge any joining fees, security deposits, or hidden costs. Therefore, you can start without any financial investment.
Q3: What if I don’t have an Android phone?
Currently, the WeRize Partner App is available only on the Google Play Store for Android phones. However, you can use any Android smartphone.
Q4: Can I register if my Aadhaar is not linked to my mobile?
No, your Aadhaar must be linked to your mobile number for OTP verification. Therefore, link your Aadhaar first. You can do this by visiting your nearest Aadhaar center or online through the UIDAI website.
Q5: What happens if my PAN doesn’t match my name?
Your PAN name should match your other documents. If there’s a mismatch, the system may reject your application. Therefore, ensure all documents have consistent names. Moreover, correct any differences before registration.
Q6: Can I skip the bank details section?
Yes, you can skip adding bank details during registration. However, you won’t receive commission payments until you add them. Therefore, we recommend adding bank details immediately to avoid missing any payments.
Q7: How soon can I start working after registration?
You can start working immediately after successful registration. The app gives you instant access to all features. Therefore, you can begin adding customers and submitting applications right away.
Q8: What if my selfie verification keeps failing?
If selfie verification fails often, try these solutions. First, ensure good lighting and a clear background. Second, remove glasses or caps. Third, clean your camera lens. Additionally, try at different times. If problems persist, contact WeRize support.
Q9: Will I receive any confirmation after registration?
Yes, you’ll receive a confirmation email after successful registration. Additionally, the App will show your Partner dashboard. Moreover, you’ll get a unique partner ID that identifies you in the system.
Q10: Can I register as both a WeRize customer and DSA?
No, you should register either as a customer or as a DSA partner, not both.


